中文翻译版:https://github.com/YYRise/black-hat-go
接下来第六章是讲SMB和NTLM的,但其实原版书里面讲的主要是基于SMB协议数据结构编码和解码的处理方式,对于具体的协议交互方式和算法细节书里只给了个官方文档的名称,但自己也没深入去研究过SMB的东西,所以顺便也把SMB相关的细节都看了一遍,内容比较多,所以单独写一篇记录一下
这一章书里的实战项目实现了一个SMB登录的过程,并且基于此写了个密码爆破程序,所以我的学习过程也是基于这个项目的代码的,地址https://github.com/stacktitan/smb,参考的版本也和书上的一致,为SMB2.1。
首先是一些做参考的文档和RFC:
SMB的工作流程#
搭建SMB服务#
通过抓包可以分析出SMB的交互过程。在分析之前首先需要搭建一个SMB服务
Kali可以直接通过apt安装:sudo apt install samba,然后启动smbd服务即可:sudo systemctl start smbd.service
Windows通过开启Windows功能里的SMB有关项来开启SMB服务,然后设置文件夹属性里的高级共享即可启用文件夹的SMB共享
搭建好服务后,在运行框里或文件资源管理器地址栏输入\\IP\即可访问对应的SMB服务了。
SMB工作流程分析#
搭建好服务之后,直接使用运行或文件资源管理器访问并抓包,可以获取到完整的SMB数据包细节:
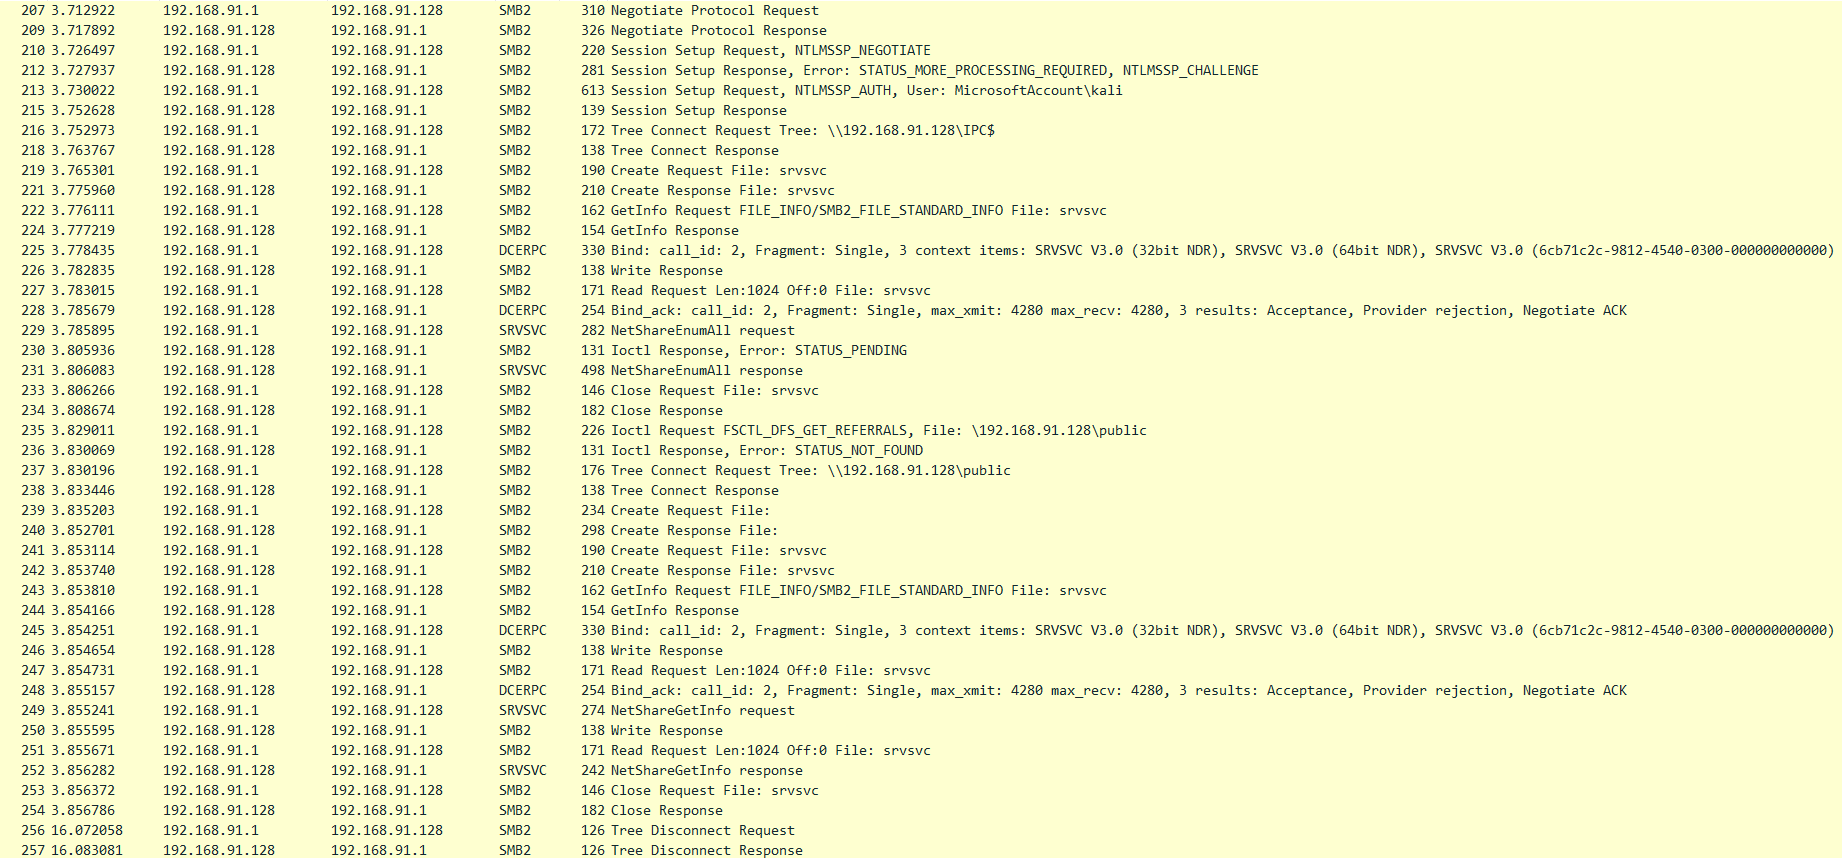
因为这一章不太关心具体的SMB文件操作等细节,所以这些数据包其实就可以简单的分成以下的五个部分:
- Negotiate
- Session Setup
- Tree Connect
- 具体的文件操作
- Tree Disconnect
其中在Session Setup过程成功后,就可以多次进行步骤3-5,用于访问不同位置的共享。
Negotiate#
Negotiate消息用于客户端和服务器进行SMB版本的协商。首先客户端发送Negotiate Request,里面包含有客户端所支持的所有SMB版本(Dialect),服务器接收到请求之后解析并返回Negotiate Response,通知客户端首选的SMB版本。Negotiate消息完成之后,后续双方即使用协商好的SMB版本进行交互。
Session Setup#
Session Setup消息用于进行会话的设置。在SMB2.1中,通常情况下会在Session Setup消息中进行NTLMSSP的认证环节,具体细节将在下文中提到。这个过程将确定整个会话的ID,包含在SMB Header的SessionID字段中。
Tree Connect#
Tree Connect消息用于在认证成功后,客户端对目标对应共享目录的连接。如果没有指定共享名称仅有\\IP\的话,那么默认将连接到命名管道$IPC,否则将直接连接对应的共享。此后双方就建立起了一条逻辑的数据连接,以SMB Header中的TreeID进行标识。
Tree Disconnect#
Tree Disconnect消息用于断开通过Tree Connect建立的逻辑连接,通过SMB Header中的TreeID进行标识。服务器收到客户端发送的Tree Disconnect Request消息后将根据TreeID释放资源(包括文件、目录以及加在文件或目录上的互斥锁),然后返回给客户端Tree Disconnect Response消息,此后该TreeID无效。
NTLMSSP#
SMB的会话创建需要对客户端的身份进行验证,只有客户端的身份拥有对应权限才能予以访问,验证方式即为NTLMSSP(NTLM Secure Service Provider)。在SMB 2.1中,这个过程包含在Session Setup消息中,一共通过4个数据包来完成验证。这里仅涉及NTLMSSP的认证流程,不涉及数据结构等细节。
下图是Microsoft文档里有关NTLM over SMB的介绍,认证的环节也就是图中的第3-6步:

- 如果通过Negotiate Response确认了对NTLM的支持,那么客户端将对服务器发送NTLM Negotiate Message,用于向服务器协商一些NTLM的参数(包含于
NegotiateFlags字段) - 服务器返回NTLM Challenge Message,包含一个Server Challenge值以及一些服务器的基本信息(域名、计算机名、时间戳等)
- 客户端收到Server Challenge,并且在本地生成一个Client Challenge,基于这两个字段值以及其他的一些信息加密计算出最终的NTLM Response和LM Response,并将结果封装进NTLM Authenticate Message,发回服务器验证
- 服务器验证Response(如果有域就交由DC进行验证),获取用户密码的Hash用同样方式进行加密并和Response进行比较,若一致则验证通过,返回最后一个Session Setup Response消息,SMB Header中的
Status字段值为STATUS_SUCCESS(0x00000000)
接下来介绍NTLM具体的认证算法。首先从Microsoft文档关于NTLM Authentication的介绍中有关于整个认证过程中加密算法的伪代码,包括一些单向函数和计算最终Response的函数。(文中具体的密码学术语可以在这里找到定义:MS-NLMP - Appendix A: Cryptographic Operations Reference)
需要注意的是:这些单向函数都是版本依赖的,NTLMv1的函数只能用于NTLMv1,NTLMv2同理。且文档中要求整个过程中的所有字符串都必须是Unicode字符串,对应到Windows的数据类型是RPC_UNICODE_STRING:
The NT and LM response keys MUST be encoded using the following specific one-way functions where all strings are encoded as RPC_UNICODE_STRING.
NTLMv1#
NTLMv1属于早期版本,如今由于种种安全性问题和一些局限性(密码只支持14位及以下),Microsoft在2010年就不再推荐在应用程序里使用NTLMv1。
首先是两个单向函数(One-Way Function)NTOWFv1()和LMOWFv1(),伪代码和Go代码实现如下:
 1
 2
 3
 4
 5
 6
 7
 8
 9
10
11
12
13
14
15
16
17
18
19
20
21
22
23
| // Define NTOWFv1(Passwd, User, UserDom) as MD4(UNICODE(Passwd))
func NTOWFv1(password string) []byte {
m := md4.New()
m.Write(ToUnicode(password))
return m.Sum(nil)
}
// Define LMOWFv1(Passwd, User, UserDom) as
// ConcatenationOf(
// DES( UpperCase( Passwd)[0..6],"KGS!@#$%"),
// DES( UpperCase( Passwd)[7..13],"KGS!@#$%")
// )
func LMOWFv1(password string) []byte {
passwd := []byte(strings.ToUpper(password))
if len(passwd) < 14 {
length := len(passwd)
for i := 0; i < 14-length; i++ {
passwd = append(passwd, 0)
}
}
// function DESKey() is used to add parity bits
return append(DES(DESKey(passwd[:7]), []byte("KGS!@#$%")), DES(DESKey(passwd[7:]), []byte("KGS!@#$%"))...)
}
|
接下来是计算响应值的函数,在NTLMv1中这个值的计算方式受NegotiateFlags中的NTLMSSP_NEGOTIATE_EXTENDED_SESSIONSECURITY位影响。当该位被设置时则允许NTLMv1使用NTLMv2中有的扩展会话安全选项,体现在计算方式上就是添加了Client Challenge;否则直接使用上面的两个单向函数对Server Challenge进行加密。
 1
 2
 3
 4
 5
 6
 7
 8
 9
10
11
12
13
14
15
16
17
18
19
20
21
| // Set LmChallengeResponse to DESL(ResponseKeyLM, CHALLENGE_MESSAGE.ServerChallenge)
func ComputeLMv1Response(hash []byte, challenge []byte) []byte {
return DESL(hash, challenge)
}
// Set NtChallengeResponse to DESL(ResponseKeyNT, CHALLENGE_MESSAGE.ServerChallenge)
func ComputeNTLMv1Response(hash []byte, challenge []byte) []byte {
return ComputeLMv1Response(hash, challenge)
}
// Set LmChallengeResponse to ConcatenationOf{ClientChallenge, Z(16)}
func ComputeLMv1ResponseWithSessionSecurity(challenge []byte) []byte {
return append(challenge,0,0,0,0,0,0,0,0,0,0,0,0,0,0,0,0)
}
// Set NtChallengeResponse to DESL(ResponseKeyNT, MD5(ConcatenationOf(CHALLENGE_MESSAGE.ServerChallenge, ClientChallenge))[0..7])
func ComputeNTLMv1ResponseWithSessionSecurity(nthash, serverChallenge, clientChallenge []byte) []byte {
m := md5.New()
m.Write(append(serverChallenge, clientChallenge...))
return DESL(nthash, m.Sum(nil)[:7])
}
|
NTLMv2#
NTLMv2是作为NTLMv1的一个替代版本,其拥有更高的密码学强度以及安全性,加密算法不再使用DES而是使用HMAC。
 1
 2
 3
 4
 5
 6
 7
 8
 9
10
11
12
13
14
15
16
17
18
19
20
21
22
23
24
25
26
27
28
29
30
31
32
33
| // Define NTOWFv2(Passwd, User, UserDom) as
// HMAC_MD5(MD4(UNICODE(Passwd)), UNICODE(ConcatenationOf(Uppercase(User), UserDom)))
func NTOWFv2(password, user, userDomain string) []byte {
h := hmac.New(md5.New, NTOWFv1(password))
h.Write(ToUnicode(strings.ToUpper(user)+userDomain))
return h.Sum(nil)
}
// Define LMOWFv2(Passwd, User, UserDom) as NTOWFv2(Passwd, User, UserDom)
func LMOWFv2(password, user, userDomain string) []byte {
return NTOWFv2(password, user, userDomain)
}
// Set temp to ConcatenationOf(Responserversion, HiResponserversion, Z(6), Time, ClientChallenge, Z(4), ServerName, Z(4))
// Set NTProofStr to HMAC_MD5(ResponseKeyNT, ConcatenationOf(CHALLENGE_MESSAGE.ServerChallenge, temp))
// Set NtChallengeResponse to ConcatenationOf(NTProofStr, temp)
// Set LmChallengeResponse to ConcatenationOf(HMAC_MD5(ResponseKeyLM, ConcatenationOf(CHALLENGE_MESSAGE.ServerChallenge, ClientChallenge)), ClientChallenge )
func ComputeNTLMv2Response(nthash, lmhash, clientChallenge, serverChallenge, timestamp, serverName []byte) (NTChallengeResponse, LMChallengeResponse []byte) {
temp := []byte{1, 1}
temp = append(temp, 0, 0, 0, 0, 0, 0)
temp = append(temp, timestamp...)
temp = append(temp, clientChallenge ...)
temp = append(temp, 0, 0, 0, 0)
temp = append(temp, serverName ...)
temp = append(temp, 0, 0, 0, 0)
hmacNT := hmac.New(md5.New, nthash)
hmacLM := hmac.New(md5.New, lmhash)
hmacNT.Write(append(serverChallenge, temp ...))
hmacLM.Write(append(serverChallenge, clientChallenge ...))
ntProofStr := hmacNT.Sum(nil)
lmProofStr := hmacLM.Sum(nil)
return append(ntProofStr, temp ...), append(lmProofStr, clientChallenge ...)
}
|
数据结构#
总体来看,SMB数据包是NetBIOS Session Service的一部分,SMB的数据包结构包含SMB Header以及具体的SMB消息内容,后者的消息类型由SMB Header里的Command字段确定,具体的数据结构在Microsoft文档里有详细的说明。
1
2
3
4
5
6
| NetBIOS Session Service
└── MessageType (1 byte)
└── Length (3 bytes)
└── SMB Data
└── SMB Header (64 bytes)
└── SMB Message
|
接下来分析存在于会话建立过程中的安全数据块(Security Buffer)。在Negotiate和Session Setup消息中,除去Negotiate Request,其他所有的消息均携带该数据块。在Negotiate消息中,安全数据块携带了有关服务器所支持的安全协商方法;在Session Setup消息中,安全数据块则用于携带NTLMSSP的认证数据(如果支持的话)。
在这些携带安全数据块的数据包中,首先含有两个字段,分别是SecurityBufferOffset和SecurityBufferLength,用于指示字段SecurityBuffer在数据包中的偏移量和长度。由于安全数据块的长度是可变的,所以其通常是被放置在数据包的末尾。
这部分数据是按照根据GSS-API的规范来实现的,对应到RFC 2743;而更具体的描述则是GSS-API下的一套协商机制,称为SPNEGO(The Simple and Protected GSS-API Negotiation),对应到RFC 4178。RFC中提到,这一套协商机制的数据编码是遵守ASN.1中的可辨别编码规则 (Distinguished Encoding Rules, DER) 来进行实现的。下面基于一个捕获到的Security Buffer来对数据结构进行解析。
1
2
3
4
5
| 00000000 60 48 06 06 2b 06 01 05 05 02 a0 3e 30 3c a0 0e |`H..+......>0<..|
00000010 30 0c 06 0a 2b 06 01 04 01 82 37 02 02 0a a3 2a |0...+.....7....*|
00000020 30 28 a0 26 1b 24 6e 6f 74 5f 64 65 66 69 6e 65 |0(.&.$not_define|
00000030 64 5f 69 6e 5f 52 46 43 34 31 37 38 40 70 6c 65 |d_in_RFC4178@ple|
00000040 61 73 65 5f 69 67 6e 6f 72 65 |ase_ignore|
|
文档中提到可辨别编码规则使用的传输语法始终遵循 标记、长度、值 格式,即所有数据结构都由这三个部分组成。标记(Tag)标识了当前数据的类型,长度(Length)即为数据的长度,值(Value)则是具体的数据值。
先看RFC 2713的一段说明:
This section specifies a mechanism-independent level of encapsulating representation for the initial token of a GSS-API context establishment sequence, incorporating an identifier of the mechanism type to be used on that context and enabling tokens to be interpreted unambiguously at GSS-API peers. Use of this format is required for initial context establishment tokens of Internet standards-track GSS-API mechanisms; use in non-initial tokens is optional.
The encoding format for the token tag is derived from ASN.1 and DER (per illustrative ASN.1 syntax included later within this subsection), but its concrete representation is defined directly in terms of octets rather than at the ASN.1 level in order to facilitate interoperable implementation without use of general ASN.1 processing code. The token tag consists of the following elements, in order:
- 0x60 – Tag for [APPLICATION 0] SEQUENCE; indicates that constructed form, definite length encoding follows.
- Token length octets, specifying length of subsequent data. ……
- 0x06 – Tag for OBJECT IDENTIFIER
- Object identifier length – length (number of octets) of the encoded object identifier contained in element 5 ……
- Object identifier octets ……
从第一段可以发现,GSS-API使用的令牌格式是不受协商方式影响的,也就是所有协商方式都必须先遵守GSS-API的格式;接下来是其包含的一系列元素。基于这个规则,可以读出上面那段二进制数据的前几个字节(SPNEGO的Object Identifier在RFC 4178中可以找到):
1
2
3
| 0000: 60 48 ; [APPLICATION 0] SEQUENCE (72 Bytes)
0002: 06 06 ; OBJECT IDENTIFIER (6 Bytes)
0004: 2b 06 01 05 05 02 ; OID: 1.3.6.1.5.5.2 (SPNEGO)
|
读完了GSS-API的通用结构,那么接下来就是属于SPNEGO的数据结构了,所以接下来的数据结构信息也都在RFC 4178中。按照ASN.1的规则接着往下读,就可以得到这是一个NegTokenInit2消息,是对NegTokenInit消息的一个扩展:MS-SPNG - NegTokenInit2
 1
 2
 3
 4
 5
 6
 7
 8
 9
10
11
12
13
14
| 0000: 60 48 ; [APPLICATION 0] SEQUENCE (72 Bytes)
0002: 06 06 ; OBJECT IDENTIFIER (6 Bytes)
0004: 2b 06 01 05 05 02 ; OID: 1.3.6.1.5.5.2 (SPNEGO)
000a: a0 3e 30 3c ; Type NegTokenInit SEQUENCE (60 Bytes)
000e: a0 0e 30 0c ; Type MechTypeList SEQUENCE (12 Bytes)
0012: 06 0a ; OBJECT IDENTIFIER (10 Bytes)
0014: 2b 06 01 04 01 82 37 02 02 0a ; OID: 1.3.6.1.4.1.311.2.2.10 (NTLMSSP)
001e: a3 2a 30 28 ; Type NegHints SEQUENCE (40 Bytes)
0022: a0 26 1b 24 ; Type hintName GeneralString (36 Bytes)
0026: 6e 6f 74 5f 64 65 66 69
002e: 6e 65 64 5f 69 6e 5f 52
0036: 46 43 34 31 37 38 40 70
003e: 6c 65 61 73 65 5f 69 67
0046: 6e 6f 72 65 ; not_defined_in_RFC4178@please_ignore
|
Go代码实现#
数据结构的定义#
为了能够更好的处理数据,需要将文档中对消息结构的描述转换为Go结构体。在处理类型的时候,归纳起来可以分为下面几类:
- 若字段数据为定长字节数据(如NTLMSSP里的Identifier,是一个固定值
NTLMSSP\x00),则直接使用[]byte - 若字段数据为定长数据且长度符合
uint,则使用对应长度的uint(uint8、uint16、uint32、uint64) - 若字段数据还对应着一个固定结构,则直接指定类型为对应结构体
- 若字段数据是一个数组,则直接指定对应类型的数组即可
下面以Negotiate Request的结构体举例:
 1
 2
 3
 4
 5
 6
 7
 8
 9
10
11
12
13
14
15
16
17
18
19
20
21
22
23
24
25
26
27
| type Header struct {
ProtocolID []byte
StructureSize uint16
CreditCharge uint16
Status uint32
Command uint16
Credits uint16
Flags uint32
NextCommand uint32
MessageID uint64
Reserved uint32
TreeID uint32
SessionID uint64
Signature []byte
}
type NegotiateRequest struct {
Header
StructureSize uint16
DialectCount uint16
SecurityMode uint16
Reserved uint16
Capabilities uint32
ClientGUID []byte
ClientStartTime uint64
Dialects []uint16
}
|
在定义数据结构的时候,一定要确保每个字段的长度正确,否则服务器会因为读取不到合法的数据而丢弃数据包。
接下来是SPNEGO里面的ASN.1定义。这里使用的是官方的encoding/asn1包,根据ASN.1的定义,如果一个Tag没有指定显式或隐式关键字,则默认为显式,所以所有的字段都要加asn1:explicit标签;除此之外对于OPTIONAL的字段还需要添加asn1:omitempty和asn1:optional标签以表示其为可选字段且当字段为空时自动忽略。最后就是根据定义中的Tag标号进行标识即可。
 1
 2
 3
 4
 5
 6
 7
 8
 9
10
11
12
13
14
15
16
17
18
19
20
21
22
23
24
25
26
27
28
29
30
31
32
33
34
35
36
37
| type NegTokenInit struct {
OID asn1.ObjectIdentifier
Data NegTokenInitData `asn1:"explicit"`
}
// NegTokenInit ::= SEQUENCE {
// mechTypes [0] MechTypeList,
// reqFlags [1] ContextFlags OPTIONAL,
// mechToken [2] OCTET STRING OPTIONAL,
// mechListMIC [3] OCTET STRING OPTIONAL,
// ...
// }
type NegTokenInitData struct {
MechTypes []asn1.ObjectIdentifier `asn1:"explicit,tag:0"`
ReqFlags asn1.BitString `asn1:"explicit,omitempty,optional,tag:1"`
MechToken []byte `asn1:"explicit,omitempty,optional,tag:2"`
MechListMIC []byte `asn1:"explicit,omitempty,optional,tag:3"`
}
// NegTokenResp ::= SEQUENCE {
// negState [0] ENUMERATED {
// accept-completed (0),
// accept-incomplete (1),
// reject (2),
// request-mic (3)
// } OPTIONAL,
// supportedMech [1] MechType OPTIONAL,
// responseToken [2] OCTET STRING OPTIONAL,
// mechListMIC [3] OCTET STRING OPTIONAL,
// ...
// }
type NegTokenResp struct {
NegState asn1.Enumerated `asn1:"explicit,omitempty,optional,tag:0"`
SupportedMech asn1.ObjectIdentifier `asn1:"explicit,omitempty,optional,tag:1"`
ResponseToken []byte `asn1:"explicit,omitempty,optional,tag:2"`
MechListMIC []byte `asn1:"explicit,omitempty,optional,tag:3"`
}
|
编码(Marshal)和解码(Unmarshal)方法的实现#
对于SMB的代码实现,最关键的就是对数据的编码和解码。因为SPNEGO采用的是ASN.1编码,而其他的部分则是普通的二进制编码,所以这里希望可以实现两个方法,来分别实现对所有对象的编、解码。根据书上的思路,首先写一个接口,使得不同的结构体可以自由实现自己的编解码方法:
1
2
3
4
| type BinaryMarshallable interface {
MarshalBinary() ([]byte, error)
UnmarshalBinary(buf []byte) (interface{}, error)
}
|
然后在这个通用的编解码方法中,首先会检查输入的对象是否拥有自己的编解码处理逻辑,若有则直接调用(通过Go的类型断言来进行判断);否则将进入一个通用的处理逻辑。
首先介绍对于SPNEGO部分的ASN.1数据的处理。对于ASN.1数据的编解码直接采用asn1包中的方法即可。这里采用的是asn1.MarshalWithParams()以及asn1.UnmarshalWithParams()方法,原因是最外层的数据表示两种消息类型存在差别:NegTokenInit的第一个字节为0x60,而NegTokenResp的第一个字节为0xa1。这个可以结合具体的数据包分析,最终添加合适的Tag就可以正常的解析了。
 1
 2
 3
 4
 5
 6
 7
 8
 9
10
11
12
13
14
15
16
17
18
19
20
21
22
23
24
25
26
27
28
29
30
31
32
33
34
| func (nti *NegTokenInit) MarshalBinary() ([]byte, error) {
ret, err := asn1.MarshalWithParams(*nti, "application")
if err != nil {
panic(err)
return nil, err
}
return ret, nil
}
func (nti *NegTokenInit) UnmarshalBinary(buf []byte) (interface{}, error) {
data := NegTokenInit{}
_, err := asn1.UnmarshalWithParams(buf, &data, "application")
if err != nil {
return nil, err
}
return &data, nil
}
func (nts *NegTokenResp) MarshalBinary() ([]byte, error) {
ret, err := asn1.MarshalWithParams(*nts, "explicit,tag:1")
if err != nil {
panic(err)
return nil, err
}
return ret, nil
}
func (nts *NegTokenResp) UnmarshalBinary(buf []byte) (interface{}, error) {
data := NegTokenResp{}
if _, err := asn1.UnmarshalWithParams(buf, &data, "explicit,tag:1"); err != nil {
return nil, err
}
return &data, nil
}
|
接下来是其他二进制数据的编码和解码实现。对二进制数据的读写使用的是binary包中的Read()和Write()方法,具体的实现方法和书上的描述一样使用的是Go反射机制,而我在查阅资料的时候看到一份代码采用的是强转指针来实现,简单粗暴了属于是,但感觉没有反射实现的优雅。使用反射机制的好处在于,因为经过反射处理的数据类型都是一致的,所以可以直接实现单个方法对任意类型的数据进行处理,只需要在内部根据数据类型写不同的处理逻辑就可以了。下面以Marshal()方法的部分代码进行分析(Unmarshal()的实现方法类似):
 1
 2
 3
 4
 5
 6
 7
 8
 9
10
11
12
13
14
15
16
17
18
19
20
21
22
23
24
25
26
27
28
29
30
31
32
33
34
35
36
37
38
39
40
41
42
43
44
45
46
47
48
49
50
51
52
53
54
55
56
57
58
59
60
61
62
63
64
65
66
67
68
69
70
| func Marshal(v interface{}) ([]byte, error) {
var ret []byte
// 获取反射Type和Value对象
typev := reflect.TypeOf(v)
valuev := reflect.ValueOf(v)
// 判断类型是否拥有自己的编码/解码方法
bm, ok := v.(BinaryMarshallable)
if ok {
buf, err := bm.MarshalBinary()
if err != nil {
return nil, err
}
return buf, nil
}
// 指针则将其更改为实际指向的数据
if typev.Kind() == reflect.Ptr {
valuev = reflect.Indirect(reflect.ValueOf(v))
typev = valuev.Type()
}
w := bytes.NewBuffer(ret)
switch typev.Kind() {
case reflect.Struct:
// 对于结构体,遍历其每个成员进行递归调用,正常返回后写入
for i := 0; i < typev.NumField(); i++ {
buf, err := Marshal(valuev.Field(i).Interface(), meta)
if err != nil {
return nil, err
}
if err := binary.Write(w, binary.LittleEndian, buf); err != nil {
return nil, err
}
}
case reflect.Slice, reflect.Array:
// 针对[]byte以及其他的数组和Slice
switch typev.Elem().Kind() {
case reflect.Uint8:
if err := binary.Write(w, binary.LittleEndian, v.([]uint8)); err != nil {
return nil, err
}
case reflect.Uint16:
if err := binary.Write(w, binary.LittleEndian, v.([]uint16)); err != nil {
return nil, err
}
}
// 其他基本数据类型
case reflect.Uint8:
if err := binary.Write(w, binary.LittleEndian, valuev.Interface().(uint8)); err != nil {
return nil, err
}
case reflect.Uint16:
data := valuev.Interface().(uint16)
if err := binary.Write(w, binary.LittleEndian, data); err != nil {
return nil, err
}
case reflect.Uint32:
if err := binary.Write(w, binary.LittleEndian, data); err != nil {
return nil, err
}
case reflect.Uint64:
if err := binary.Write(w, binary.LittleEndian, valuev.Interface().(uint64)); err != nil {
return nil, err
}
default:
return nil, errors.New(fmt.Sprintf("Marshal not implemented for kind: %s", typev.Kind()))
}
return w.Bytes(), nil
}
|
这样子就已经实现了最基础的编码/解码方法了,对于Negotiate这种结构相对简单的消息已经能够正常的返回编码的结果了。使用net.Dial()方法连接远程的445端口就可以向其发送数据。如果你的协议数据包存在错误的话,在Go中将会收到一个EOF panic,显示在Wireshark中,你的数据包将会显示为Malformed Packet(畸形数据包)。
但是在解码的时候就会产生一个问题:处理定长的[]byte时(比如SMB Header中的Protocol ID和NTLMSSP的Signature)如何知道这个字节数组的长度呢?作为协议的细节当然已经写在文档里了,但是在使用反射的时候,只能获取到某个字段的类型,无法获取到其长度。这里就需要使用到Go反射的一个最重要的特性:Tag。
Tag就是在定义结构体时出现在字段定义后的那个字符串,在之前用到的json、msgpack以及这里使用的asn1包里均用到了Tag。Tag是结构体StructField的一个成员,所以可以通过下面的代码获取到:
1
2
3
4
5
6
7
| type test struct {
a int `ThisIsATag`
}
t := reflect.TypeOf(test{})
fmt.Println(t.Field(0).Name, t.Field(0).Type, t.Field(0).Tag)
// Output:
// a int ThisIsATag
|
利用这个特性,可以在定义结构体的时候在对应定长字节串的字段后添加一个Tag,包含它的长度在Tag里面,然后在解码这个结构体的时候,首先读取这个结构体所有的Tag,然后将这个存储Tag信息的变量递归传递给各个解码调用。如果遇到了包含Tag的字段,则读取其长度,并按长度读取字节数据,这样就不会出错了。下面以SMB Header的定义为例:
 1
 2
 3
 4
 5
 6
 7
 8
 9
10
11
12
13
14
15
| type Header struct {
ProtocolID []byte `fixed:4`
StructureSize uint16
CreditCharge uint16
Status uint32
Command uint16
Credits uint16
Flags uint32
NextCommand uint32
MessageID uint64
Reserved uint32
TreeID uint32
SessionID uint64
Signature []byte `fixed:16`
}
|
在解码开始的时候,定义一个Metadata结构体,将读取到的Tag信息存储于其中,然后以指针形式传递给每次调用,才处理数据的时候直接读取:
 1
 2
 3
 4
 5
 6
 7
 8
 9
10
| if l, ok := meta.Fixed[meta.CurrentField]; ok {
meta.BufferOffset += l
data := make([]byte, l)
if err := binary.Read(r, binary.LittleEndian, &data); err != nil {
return nil, err
}
return data, nil
}else {
panic("Slice length unknown")
}
|
接下来是对文档中经常出现的xxxFields结构的处理。这类数据结构在NTLMSSP中多次出现,在SMB的消息里也有类似的SecurityBufferLength和SecurityBufferOffset,用于指定变长字节数据的位置和长度。查阅文档可以发现,下图里数据结构表达的信息其实只有xxxOffset和xxxLength(xxxMaxLen默认和xxxLength一致,且在读取的时候会被忽略)
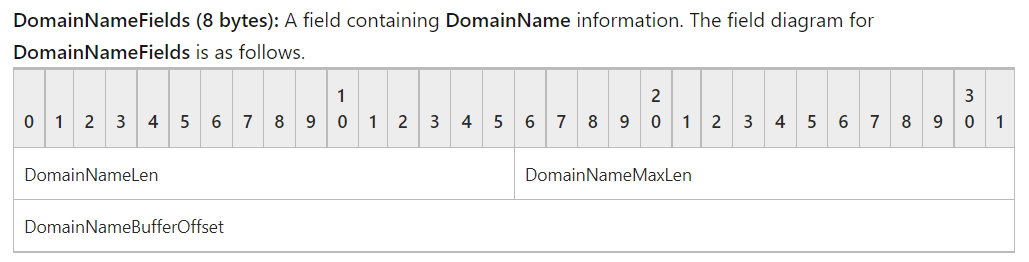
所以要做的事情就是在编码数据的时候,自动将字节数据的偏移和长度读出来并赋值给对应的字段;在解码的时候自动读取字节数据的偏移和长度,并根据读取的结果准确的查找字节数据所在的位置。同样可以利用Tag来进行实现这些数据的对应关系:
1
2
3
4
5
6
7
| type SessionSetup1Req struct {
...
SecurityBufferOffset uint16 `smb:"offset:SecurityBlob"`
SecurityBufferLength uint16 `smb:"len:SecurityBlob"`
PreviousSessionID uint64
SecurityBlob *gss.NegTokenInit
}
|
实现方法也就很好分析了:
- 编码方法
Marshal()- 接收到输入的结构体,遍历所有的字段,读取Tag信息到变量
Metadata - 对每个字段递归调用
Marshal()进行编码 - 若遇到Tag带有
offset的字段,读取Metadata找到对应的字段,随后跳出到母结构体进行计算(逐字段长度累加,匹配到对应的字段名即停止累加),返回的结果即为偏移值,直接写入为字节数据 - 若遇到Tag带有
len的字段,读取Metadata找到对应的字段,随后跳出到母结构体进行计算(读取对应字段编码后的长度即可)
- 解码方法
Unmarshal()- 接收到输入的结构体,遍历所有的字段,读取Tag信息到变量
Metadata - 按顺序对每个字段调用
Marshal()进行解码,每完成一个字段后将偏移值保存在Metadata里面,便于后续字段读取数据 - 若遇到Tag带有
offset或len的字段,存取其值在Metadata中,读取对应值的时候直接截取对应部分数据进行解码
需要注意的是,跳出到母结构体进行计算的原因是在递归进行编码的时候传入的是单个字段,无法再直接访问到结构体的其他字段,所以解决办法就是在Metadata中添加一个成员Parent用于保存其母结构体。
反射中踩的坑#
在进行解码的时候,由于采用的是反射,所以在给结构体赋值的时候也是调用的反射API进行,即value.Field(i).Set(reflect.ValueOf(data))。但是在对结构体进行赋值的时候,如果直接传入结构体类型会报错using unaddressable value,因为如果不传入指针,其内部的数据是无法被修改的(可以理解为反射创建的对象只是原有对象的一个拷贝),只有传入指针时才能够更改。是否能够设置值可以通过调用Value对象的CanSet()方法来查看。
参考资料#